I thought this was a great idea, and it was clearly the most optimal method to get variation among vast numbers of zombies in that game. So I started wondering what the possibilities would be if I applied the same technique to general props in the environment. First i realized that whatever scene you were making would have to justify using this unorthodox technique. In other words, I wouldn't really use the technique unless I had a scene where I really needed to re-use texture assets and have a high amount of color variation. I wouldn't use this technique to make a bunch of different brick textures, because frankly i think it would be a bit unnecessary. However, I would use this technique if I had to make something like a market, where you'd need lots of different fruits, spices, and other various props that you may want to reuse with different colors.
Since there's going to be a bazaar in my scene, i realized that gradient mapping would fit perfectly for generating a large amount of various colors for bazaar booths that reuse the same assets over and over, but in different scales and colors. This is a perfect opportunity to test this technique out, so I started doing some tests.
First, lets talk a little bit about how gradient mapping works in the first place. All gradient mapping does is substitute the value of a pixel in your gradient mask (the black and white image) with the color from your Gradient Map. So if half of your gradient mask is composed of black pixels, then those will be substituted with the color from the gradient map that corresponds with that black value. I tried to lay out a visual guide of what happens, which you can see below.
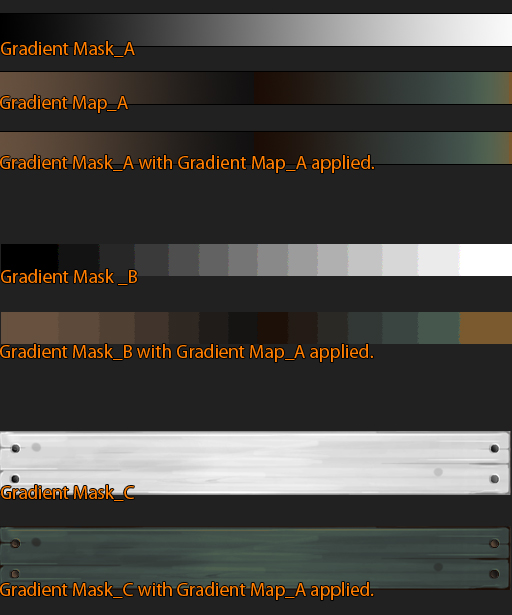
Think of GradientMask_A as a constant. This is ALWAYS how you are going to visualize how the engine will interpret your gradient map. The reason for this is because when gradient mapping is applied in the engine, we are actually using the X channel of our texture coordinates as our base "lookup" table. This will always look like GradientMask_A, because the X channel of the texture coordinate data is always going to be 0 to 1, which will always be visualized as a gradient starting with black on the left that changes to white on the right.

This is probably the hardest part to really understand about how gradient mapping works in a game engine. Think of GradientMap_A as the map we'll be importing into the engine. When we apply a gradient mask to this, what it is doing is looking up the UV coordinates of our gradient map, and taking the color value of that pixel and mapping it to any pixel in our gradient mask that corresponds with that value in UV space... so really, a gradient mask is simply an 8 bit 2D texture coordinate map!
So now that we know that the standard black to white gradient is a constant that won't change, we can start calling it our "Gradient Coordinate Table". Lets look at some actual examples of what a decent gradient map can achieve.

The black and white image at the top is our Gradient Mask. Notice how most of the wood is given a whiter value. This means that the colors to the right of the gradient map will be assigned to those white values in the gradient mask. It's simply replacing the values of the gradient mask with the colors in the gradient map. However, since you can only have 256 values from white to black, I think this means that you can only have a MAXIMUM 256 colors applied to your texture when using this gradient map technique. For this reason, your gradient map's optimal resolution is 256 units wide. Again, I could be wrong about that, but I don' think I am. The height of the gradient map depends on how many gradients you want to store into your gradient map table. a good rule of thumb is to have each of your gradient maps be 16 pixels high by 256 units wide. So if you have 8 gradients in your map, your resolution should be 256x128. The 8 pixel thickness is to maintain a decent color integrity during mip-mapping. If you're running low on texture budget, another thing you could do is just made each gradient 256 x 1 pixel, and make sure that your gradient map never gets mip mapped to lower resolution in game, or else you'll get errors.
Here is an example of the gradient map i'll be using as a demonstration. It's 256X64

When you assemble the shader in UDK you get pretty much the same result you see in Photoshop.

The node labeld Y-Coordinate is the coordinate along the gradient map texture... so setting it to 0.7 would set it just about along the lines of the 3rd gradient down, which gives us what we see in the shader preview window. It's a pretty easy setup too.
If you want to learn a bit more, check out Valve's power point on the subject that I linked at the top of the post.
Cheers!
super cool stuff
ReplyDeleteAwesome! I saw this technique months ago along with their technique to achieve a realistic water flow in Portal2. But srsly i never thought about a way to reuse this technique for other things than characters. Anyway thanks for this great article, will definitely come in handy!
ReplyDeleteAwesome technique.
ReplyDeleteman! all your articles are so great ! i hope to read more in the future. thanks !
ReplyDeletegreat stuff man, thanks for the article!
ReplyDeleteThanks a lot for this short, but really interesting article
ReplyDeleteFantastic technique, thanks for the article!
ReplyDeleteGreat post.
ReplyDeletehttps://telegra.ph/Lesser-known-facts-about-evolution-of-SEO-12-01
Great post.
ReplyDeletehttps://www.workerscompensation.com/forums/general/member.php?action=profile
Great post.
ReplyDeletehttp://www.divephotoguide.com/user/Lorenzo
Great post.
ReplyDeletehttps://note.com/robertlopez